Ensure the safety and reliability of your trailer by following this step-by-step DIY inspection guide.
VISUAL INSPECTION
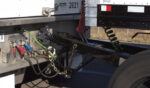
At least once a month, closely examine the entire length of your trailer’s wiring harness, paying special attention to connectors and junction points. Look out for any signs of wear, fraying, or visible damage.
Begin by thoroughly examining all exterior and interior trailer lights. Look for any signs of trouble, including:
- Broken bulbs: dim or flickering lights often point to burnt-out bulbs.
- Frayed wires: exposed wires pose a safety hazard and can disrupt electrical flow.
- Loose connections: ensure all connections are secure to prevent flickering or malfunctioning lights. Check for corrosion on connectors and replace them if need be.
- Checking the trailer plug: inspect the plug for any signs of damage or corrosion. A clean, well-maintained plug ensures a secure connection to your towing vehicle.
Don’t forget to check the harness itself. Trace its path from the front to back of the trailer keeping an eye out for:
- Kinks or cuts: these can damage the wires and compromise their functionality.
- Chafing against sharp edges: this can wear down the insulation and expose the wires. This creates a path for moisture and corrosion.
Conducting a thorough visual inspection enables you to catch potential issues early, keeping your trailer safe and dependable.
ELECTRICAL ASSESSMENT
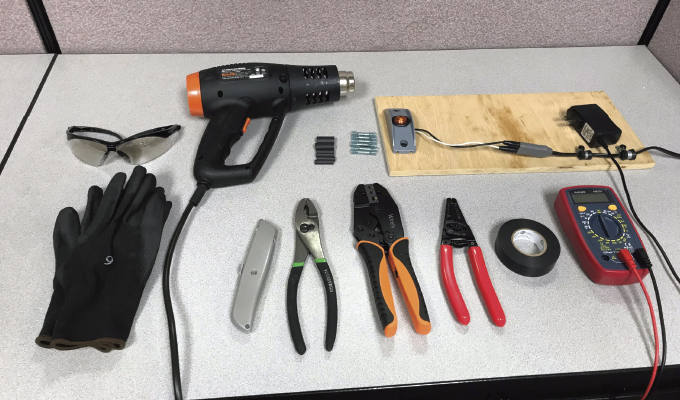
Next, conduct a systematic check of the trailer’s electrical components. You’ll need your multimeter and the trailer manual.
Voltage Measurement
- Connect the red multimeter test lead to the positive terminal of the harness connector and the black test lead to the trailer frame or if closed loop system the ground wire.
- Consult your trailer’s manual for specific voltage values at key points within the harness, typically around 12 to 14 volts. Carefully evaluate designated points and record the readings.
NOTE: Be careful not to damage the wires insulation. Damaging the wiring insulation will create a path for moisture and corrosion.
Ground Connection Verification
Locate the ground connection, which is often a bolted connection to the trailer frame. Ensure the connection is secure and free of corrosion. Loose or corroded grounds can disrupt the entire electrical circuit, causing flickering lights, equipment malfunctions, or even safety hazards.
Interpreting the Clues
- Consistent readings within the recommended range indicate a healthy electrical system.
- Fluctuations or significantly lower readings than recommended signal potential issues like faulty connections, damaged wires, or overloaded circuits.

LAST DO’S AND DON’TS
In addition, always follow these good maintenance practices:
- Periodically use dielectric grease to protect bare metal terminals (if they are not otherwise sealed from wire and corrosive chemicals).
- Never use a test probe by puncturing the insulation jackets of the wires.
- When repairs must be made, splice wires together using glue-filled, heat shrink crimp connectors to affect a completely sealed connection.
- Always wear eye protection when working underneath equipment. Debris can easily fall or be blown into your eyes when working under equipment.
- Ensure a lock out tag out process is in place so that the equipment you are working on will not be moved without your knowledge and consent.
PROACTIVE MAINTENANCE
Adopting a proactive stance towards maintenance guarantees the longevity and reliability of your trailer’s wiring harness. Here’s what you can do:
- Wire protection: seal exposed wire ends with electrical tape or heat shrink tubing. This prevents shorts and corrosion, safeguarding your circuits.
- Harness care: apply a protective coating, like liquid electrical tape or harness spray, to the entire harness, especially in areas exposed to the elements. This creates a barrier against UV rays, salt, and abrasion, extending the harness’s lifespan and preventing cracks.
- Component integrity: inspect all connectors for wear and tear, including cracks, corrosion, or loose pins. Replace any damaged connectors to ensure proper electrical flow. Check for corrosion every three months, especially if you frequently expose your trailer to harsh conditions.
- Trailer grounding: Check for loose ground connections and tighten them securely. A loose ground is like a faulty handshake, disrupting communication within the electrical system. Inspect the grounding every six months.
Proactive maintenance is an investment in your trailer’s health and safety. For your harness, these simple steps can extend its lifespan, minimize downtime, and ensure worry-free adventures.
EXTREME WEATHER
If you frequently use your trailer or operate in extreme weather conditions, adjust the inspection frequency accordingly. Regular inspections become even more critical for trailers that endure heavy usage or adverse climates.
Investing a little time in regular inspections safeguards your trailer’s wiring harness, ensuring a smooth and secure journey every time.
FOR MORE INFORMATION
Peterson Manufacturing is a world-class innovator in the design, engineering and assembly of commercial vehicle and trailer wiring harness and lighting systems. To learn more, visit petersonlightsandharnesses.com.